Monday, December 24, 2012

Christmas Nails

Hi, everyone!  Merry Christmas!  I did this really neat nail design idea from cutepolish - only I changed it a bit... Christmas trees!...


Really festive and pretty!  I used some red polish on my nails and then painted the tips with some gold glitter.  I made a Christmas tree on my ring fingers by drawing an outline of a triangle and filling it in with green polish.  For the Christmas tree lights, I used a glitter polish with some festive colors (red, green, silver).  And, finally, for the star (gem) on top, I painted a top coat on my nails and, while still wet, stuck on a silver gem.  Hope you liked this!  Happy Holidays!

Friday, December 7, 2012

Marbled Nails

Hi, everyone!  Sorry it's been so long since my last design - I really haven't been painting my nails much lately.  This month I promise you I'll have more posts coming!  I have a very exciting one to show you today...


It's a marbled design!  It looks so neat... I really don't think the picture shows it well enough.  I did a blue coat on my nails and then used a small piece of crumpled plastic wrap dabbed into a mint green polish and dabbed it on my nails.  I used a top coat to finish.  It makes a neat marbled design.  The colors I used worked really well - China Glaze "Secret Peri-wink-le" and Revlon "Minted".  Hope you all will try this!

Thursday, November 1, 2012

Halloween Nails

Hi, everyone!  I've got a spooky Halloween design... well, kind of spooky.  Spider webs!...


You probably can't tell, but I made a pathetic looking spider on my ring finger.  To do these, I painted my nails white and used a black polish with a small brush (striper) to paint the lines for the web.  And, if you want, you can make a spider on the ring finer with a dotting tool, but I would recommend not to because it really doesn't show up well.  Hope you all had a fun Halloween!

Saturday, October 20, 2012

Gold Glitter Nails

Hi, everyone!  I have a new nail design!...


It's gold glitter crackle nails... Yes, the glitter is crackle, but it's kind of hard to tell.  It turned out really pretty, anyway.  The design is pretty self-explanatory - paint your nails a light blue and put crackle gold glitter polish on top.  Hope you guys liked this!

Monday, October 15, 2012

Nail Polish Haul!

Hi, everyone!  I'm back with another nail polish haul!  Yay!  It's pretty small, but I always like to keep you all updated :) One of the Walgreens near me was closing out on the Sally Hansen Complete Salon Manicure nail polish, so I had to get some.  They were really cheap and I already had one that I really liked, so I was excited...


Really pretty colors!  Unfortunately, they were already out of most of the colors - maybe that's a good thing... if they had more I might have went a little too crazy :).  So, the colors, (going left to right) Frutti Petutie (the camera didn't show how hot a pink this really was - it's a shocking hot pink!), Bittersweet, Midnight in NY (this has a hint of shimmer in it - super pretty and unique!), Pedal to the Metal, and I Pink I Can.  All of these are really unique, beautiful colors (with the exception of the plain pink to the right, but it's still really pretty).  I'm so excited to try these out.  They have amazing colors!  They also have a big brush, which is a plus to me because it makes the polish go on so smooth and easily.  They aren't closing out on these everywhere, I still see them at other walgreens and walmarts, so I definitely recommend checking these out.  Comment below what your favorite color is, and if you haven't seen my latest posts, I now have a follow gadget on my blog, so please check that out and follow my blog!    

Thursday, October 11, 2012

Blog Update!

Hi, everyone.  I've got a new blog update!  Introducing the "follow" gadget...  You can now follow my blog! All you have to do is click "Join this site" under "followers" in the side bar, or/and enter your email right below that (it would be best if you can do both :)).  It's really simple and you should get an email every time I make a new post.  That way, you can stay updated.  I hope you all will follow my blog!  Let me know if you have any troubles in the comments, and I'll try to help.

Sunday, September 23, 2012

Magnetic Nails

Hi, everyone.  If you've been following my blog lately, you saw that I recently got my first magnetic nail polish with a gift card from my birthday.  I tried it out this weekend and it worked really well...


If you've never heard of magnetic nail polish before, it makes designs on your nails (mine was a star-like design) when you hold a magnet attached to the bottle over just-painted nails.  It turned out pretty good.  The lighting wasn't too good in this picture, but it looks better in real life.  Tell me how you like it!

Tuesday, September 18, 2012

Birthday haul!

It's time for my birthday haul!  Yay!  Just this past weekend my nail polish collection went from 50 to 67 - wow.  Creeping on 100...


First, I got this stack-able box (from Target) that fits my nail polishes perfectly!  It's the perfect height and has plenty of room... my 67 nail polishes fit in the bottom and there's still room to spare!  I think both containers could easily hold 200 nail polishes.  The only thing you have to be careful about - nail polishes are heavy, so you might want to hold the container from the bottom because if you hold it from the handle there might be a big mess :)  


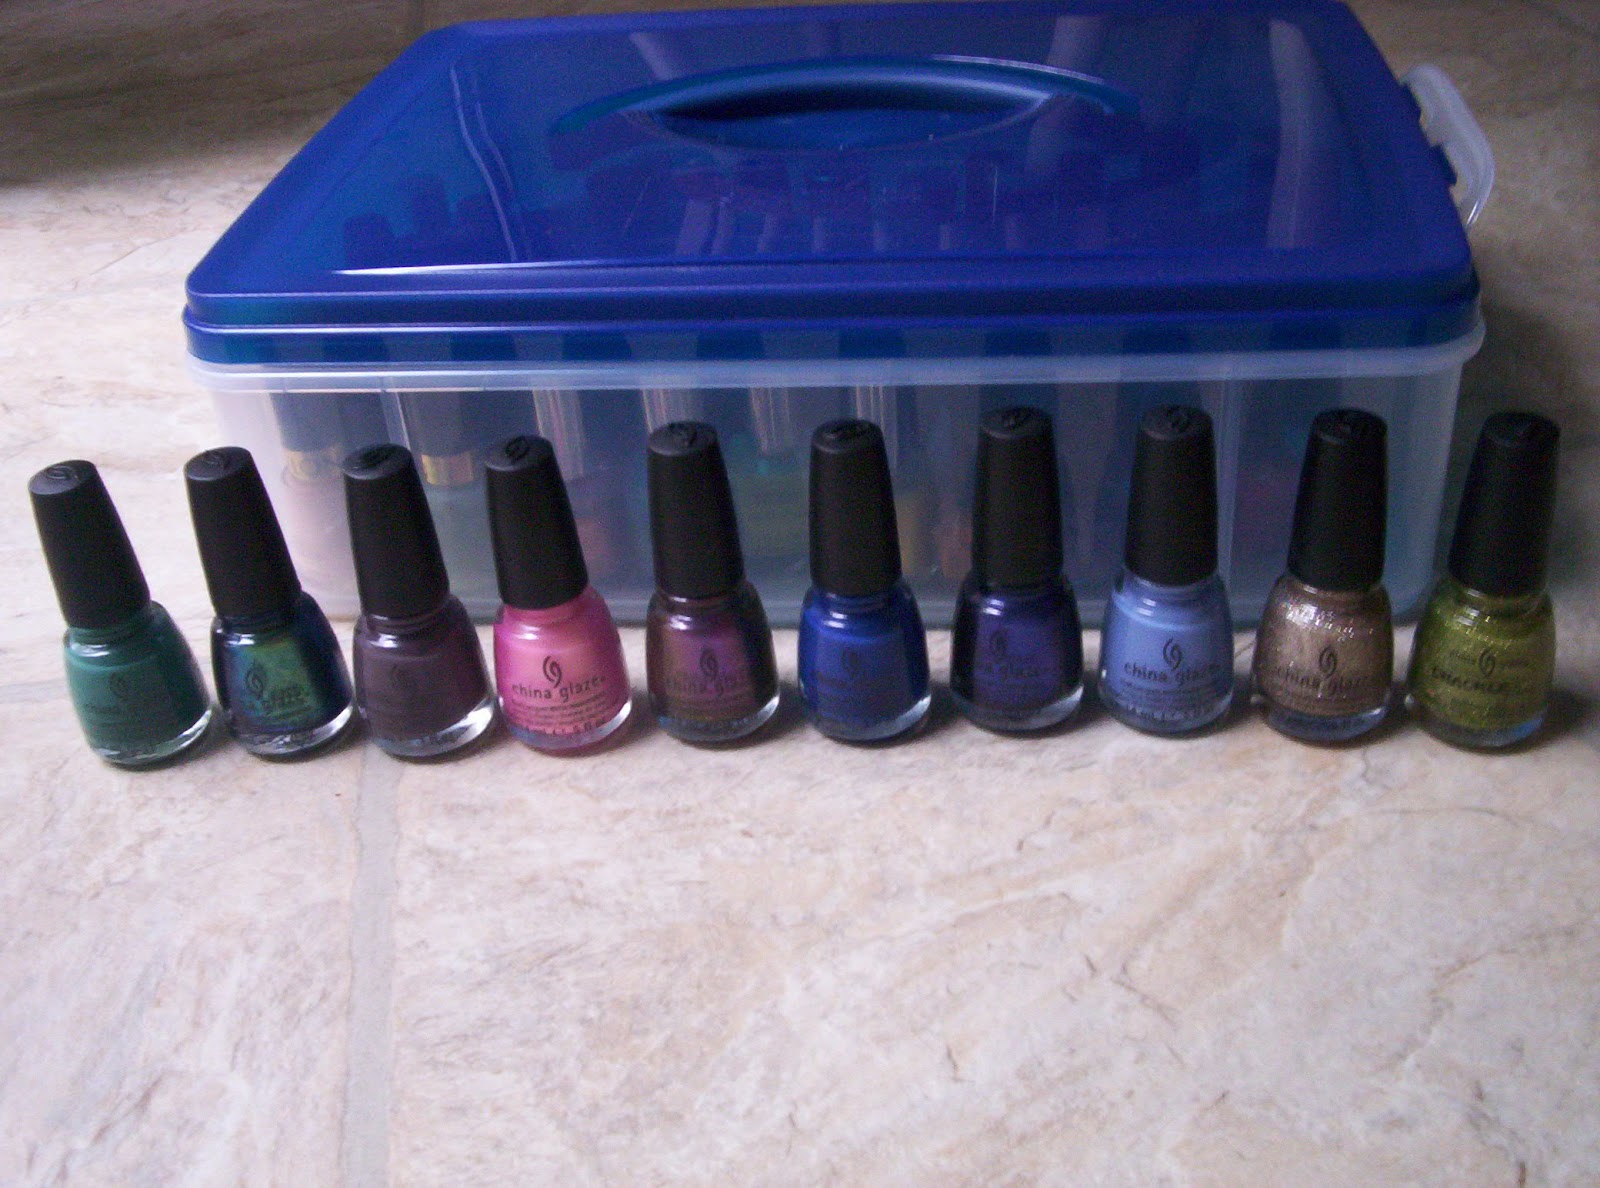
Now, the nail polishes...


I went from having none to 10 China Glaze nail polishes over this past weekend.  I also added a few other new brands to my collection.  About half of these I bought with a birthday gift card and the other half were given to me.  Starting with China Glaze... (left to right) Exotic Encounters, Deviantly Daring, Jungle Queen,  Exceptionally Gifted, No Plain Jane, Man Hunt, Want My Bawdy, Secret Peri-wink-le, I'm Not Lion, and Jade-d (crackle).  From the bottom picture, (left to right) Essie - Play Date, Turquoise & Caicos, Sinful Colors Magnetic - Charge It Up, Nichole - Rainbow in the S-Kylie, Elf - (no color name on this one), Orly - Mysterious Curse, Finger Paints - It Baroque, and Sally Girl - (again, no color name).  I'm so excited to try all of these out... let me know in the comments which ones you like.

Bonus picture...


My messy bed as I unwrap and put away everything :)


Monday, September 17, 2012

Birthday Nails!

Hi, everyone!  Well, this past weekend was my birthday - yay! - It was a lot of fun!  So, I made this party nail design...


I don't know if you can tell in this picture, but I made a faded pink french tip.  I used a base coat (as I always do) and painted the bottom 1/3 of my nails a light pink, wiping off the brush  before so there wasn't much polish on it, then I painted the tip of my nails with the same light pink but with more polish on the brush.  This makes a pretty faded effect on your nails.  After that, I used a sparkly polish for some confetti on my nails.  Really sparkly and fun!  Another blog post will be up soon on my birthday nail polish haul (probably the biggest and most fun haul ever).  Can't wait!

Monday, September 3, 2012

Kiwi Nails

Hi, everyone!  I've got another fruit nail design today - rocking on those fruits for the end of summer...


Kiwi nails!  They were pretty popular this summer, so I thought I'd try them out at the last minute... It's hard to believe summer's already almost over : / We've got a new season coming up, though - colorful fall!  Got to be excited for the new weather :) Back to my nails... for the design, I started off painting all my nails a lime green, and then added a white oval to the center of each nail (it doesn't have to be perfect).  Stick a toothpick in some white polish and draw small, short lines coming out of the white center (which I find to be the hardest part).  Dot on some black dots around the white, and you're done!  It isn't the easiest design to do, but don't get scared, it isn't the hardest, either.  Have fun!

Saturday, August 25, 2012

Handful of Strawberries

Hi, everyone!  I've got a really cute design to show you all...


Doesn't it look like a handful of strawberries?  They look so real.  This is definitely one of my favorite designs.  It was also super fun to paint these.  I painted all of my nails red and then painted on some leaves at the bottom of my nails with a small paint brush and green polish.  To do the seeds I used my paint brush again with black polish.  So cute!  I highly suggest trying this design - it's really easy and fun and will have you (and others) staring. :)

Friday, August 3, 2012

Olympic Nails

Hey, everyone!  I just came up with a new design to show some Olympic spirit...


A geometric (or block) Olympic design!  Notice the bronze, silver, and gold colors I used for my geometric design?  To do this, I painted all of my nails white and then painted all of my nails except for the thumb a bronze color.  I used a gray color (which, unfortunately, turned out to be a more blueish color) and filled the bottom 2/3 of my nails slanting in one direction.  For the gold I filled the bottom 1/3 the opposite direction (if I'm making any since).  The Olympic rings are pretty self-explanatory - I used a gold nail art pen.  Geometric and block designs are a pretty big trend right now - what better way to try one out for the first time than this neat design?  Hope you enjoyed, and will try it yourself!     

Thursday, July 26, 2012

Fish Nails

Hi, everyone!  I just painted some fish nails and have the pictures to share with you...


To do these, I painted my nails a light blue, (I highly recommend "Waterfall" by Revlon - it's such a pretty water-like color) and then painted little fishes with a nail polish with a "precision brush" on all of my nails except my ring fingers (I did the fishes purple because that's my favorite color, but any color would be fine).  For my ring fingers, I painted a big fish and used dotting tools to make the eye.  That's about it.  I thought my toes turned out really cute, so I got a pic of those...


I painted them blue and used a dotting tool to make some white dots on them... I'm really liking my dotting tools! :) Hoped you liked this!

Wednesday, July 4, 2012

4th of July flag nails

Happy 4th of July everyone!  To celebrate this holiday and show a little patriotism, I painted these flag nails...


When the nails are put together, they make the American flag!  These  are really cute and patriotic nails, but they were a little more hard and time consuming than some of my other nail designs because of stripes I had to draw on most of my nails.  To paint these, I used a base coat and painted all of my nails white, even the ones that I was going to paint blue, because I find that when I use a darker color straight on my nails, it leaves a little tint of that dark nail polish on when I take it off.  After that, I painted my index finger on my left hand, and pinky finger on my right hand blue, because when I put my fingers together on each hand, the stars will be on the correct part of the flag.  Then, I painted red stripes using a precision brush on the rest of my fingers, and stuck on some star stickers on my blue fingers.  Finally, I sealed it off with a top coat.  Hope you liked my design!  Have a fun 4th of July!

Sunday, June 24, 2012

Crackle Fun

Hi, everyone!  I got to try out my new crackle nail polish today! :) Yay!  I thought this would be a good time to try it because it would match my outfit (pics below).  It turned out to be so easy and super cute!


I'm not sure where the heart bracelet came from (I've had it for a while), I made the colorful bracelet.

Matching my skirt! :)


I had some raspberries on hand :)


My outfit!  One of my favorite outfits, too.  I'm not sure if you can see it, but my skirt has a little tie on it.  Here, let me pull out another pic...


Sorry, but I'm not sure where this outfit is from either. : / My nail polish is Sinful colors black crackle and "Easy Going".  Hope you all liked my nails and a little outfit of the day!

Tuesday, June 19, 2012

Cloud Nails

I'm back with another design - cloud nails!  These are so easy and fun, and they look great!


I used a few of my nail polishes that I got in my recent haul.  I used a base coat and painted my nails with Revlon Nail Enamel in "Waterfall".  It's such a pretty color!  In the bottle I thought it would turn out a nice sky blue, but when I painted my nails, it reminded me so much of water!  After that, I used my dotting tool dipped into white polish and dotted on three circles together to make the clouds.  Finally, I sealed it off with a top coat.  So easy and so cute!

Tuesday, June 12, 2012

Nail Polish Haul

Hey, guys!  So I'm back with yet another haul... you see, Walgreens had a lot of amazing beauty items on clearance, and you know me - unstoppable.  When I find great deals I want them.  So, that's why I'm back with yet another haul. :)


I can not tell you how long I've been wanting a crackle nail polish.  And here it finally is!  I was so excited to find this in Walgreens for only one dollar.


I fell in love with this color!  It's such a pretty, light, pastel color.  It's the Sally Hansen Salon Manicure nail polish.  The shade is "Yellow Kitty".


I ran out of white.  So here it is.  Wet n' Wild Wild Shine.


Some more Wet n' Wild that I found for fifty cents each.  Great deal, so I thought I'd get two :) Cute square bottles, too.  It's Color Icon in "Give Me a Price Quote" (left) and "Carats" (right).


This is a Revlon Mini Nail Kit.  It has some really pretty colors in it.  A very pretty blue (called "Waterfall") which I plan on using in my next design, and a sparkly color with a hint of blue sparkle in it ("Sparkle"), and a really pretty light green ("Garden").  I think the light green is very similar to my Ice nail polish in "Wild Thing".  I put a photo on the bottom to compare the size of the nail polish in the kit to the regular sized Revlon nail polish bottle.  The bigger Revlon nail polish bottle in the picture is the shade called Minted (this bottle did not come in the set).
Well, that ends my haul.  Hope you liked it!

Thursday, June 7, 2012

Wild Nails

My friend was just over yesterday and we had some fun creating some wild designs...


This is a design anyone could do!  Just paint your nails whatever design you want!  I made this a little special by putting water marbles on my left hand and designs on my other.  This fun nail project's given me some inspiration for what my next design might be... I'm liking the yin yang nail a lot.  Post in the comments below what your favorite nail is!

Sunday, May 20, 2012

Ducky Nails


I'm back with a new design on my nails!...

It's ducky nails with bubbles!  And it's cutepolish-inspired (again) :).  If you haven't been keeping up with my blog, than you might have not heard of cutepolish.  I love her designs!  She does nail art and posts her tutorials on youtube.  This is such a cute and easy design!  At first when I saw it, I thought it would be a hard design to paint, but it turned out to be great and one of my favorite designs yet!  I used my dotting tools to make these neat marbleized bubbles.  First I painted my nails with my Nail RX base coat, then I painted my nails with Sally Hansen Nail Growth Miracle in "Lush Lavender".  I used my dotting tool number 3 and dipped the large end in  yellow nail polish (I used Ice in "Excuse Me") and made the duck.  Then I dipped the small end of the dotting tool in some orange polish (I used Sinful Colors in "Courtney Orange") and made the beak.  I used the same small end of the dotting tool and dipped it in some black polish and made the eye and then the center of the eye with black polish (I used Wet n' Wild).  For the water and bubbles I dipped the large end of the nail dotting tool in some blue, (Sinful Colors in "Love Nails") aqua, (Monster High in "Lagoona Blue" or "Aqua") and white (Wet n' Wild) and tapped on some dots.  I finished off with Sally Hansen No Chip Acrylic Top Coat.  You can visit cutepolish on youtube for a good tutorial on this (I changed her duck design a little bit)... type in "cutepolish duck". :)

Friday, May 18, 2012

Nail Haul

Hey, everyone!  Happy to be back with a nail haul - the first one on this blog.  I have bought a few nail-related things in the past month, so here they are!...

The first thing I'll mention is a nail polish from Wet n' Wild.  I know, I gave them a bad review in my nail polish collection post, but I thought I'd try them again in this new Fast Dry line (it was only a dollar!).  This color is "Gray's Anatomy".  It's a beautiful and very unusual color.    Kind of hard to describe the color, but I'll say it's a green that changes to purple as you move it around in the light.
The next thing is a nail tool kit from Bath and Body Works.  Actually, I got this from a thrift store for a few dollars. :) It comes with two different sized nail clippers, a file, tweezers, a cuticle pusher, scissors, and a cuticle nipper.


I also ordered a few things off of ebay - a nail brush set and a set of dotting tools.  The brushes are three sizes and the dotting tools have double-ended tips with different sized metal balls on each end.  The dotting tools worked really nicely.  I just tried them out yesterday on a duck design that I did (I'll post about that soon).  I haven't tried the brushes out yet, but I probably will on my next design.  Hope everyone's having a good Spring!  See you soon!