Thursday, October 11, 2012
Blog Update!
Hi, everyone. I've got a new blog update! Introducing the "follow" gadget... You can now follow my blog! All you have to do is click "Join this site" under "followers" in the side bar, or/and enter your email right below that (it would be best if you can do both :)). It's really simple and you should get an email every time I make a new post. That way, you can stay updated. I hope you all will follow my blog! Let me know if you have any troubles in the comments, and I'll try to help.

Sunday, September 23, 2012
Magnetic Nails
Hi, everyone. If you've been following my blog lately, you saw that I recently got my first magnetic nail polish with a gift card from my birthday. I tried it out this weekend and it worked really well...

If you've never heard of magnetic nail polish before, it makes designs on your nails (mine was a star-like design) when you hold a magnet attached to the bottle over just-painted nails. It turned out pretty good. The lighting wasn't too good in this picture, but it looks better in real life. Tell me how you like it!
If you've never heard of magnetic nail polish before, it makes designs on your nails (mine was a star-like design) when you hold a magnet attached to the bottle over just-painted nails. It turned out pretty good. The lighting wasn't too good in this picture, but it looks better in real life. Tell me how you like it!
Tuesday, September 18, 2012
Birthday haul!
It's time for my birthday haul! Yay! Just this past weekend my nail polish collection went from 50 to 67 - wow. Creeping on 100...

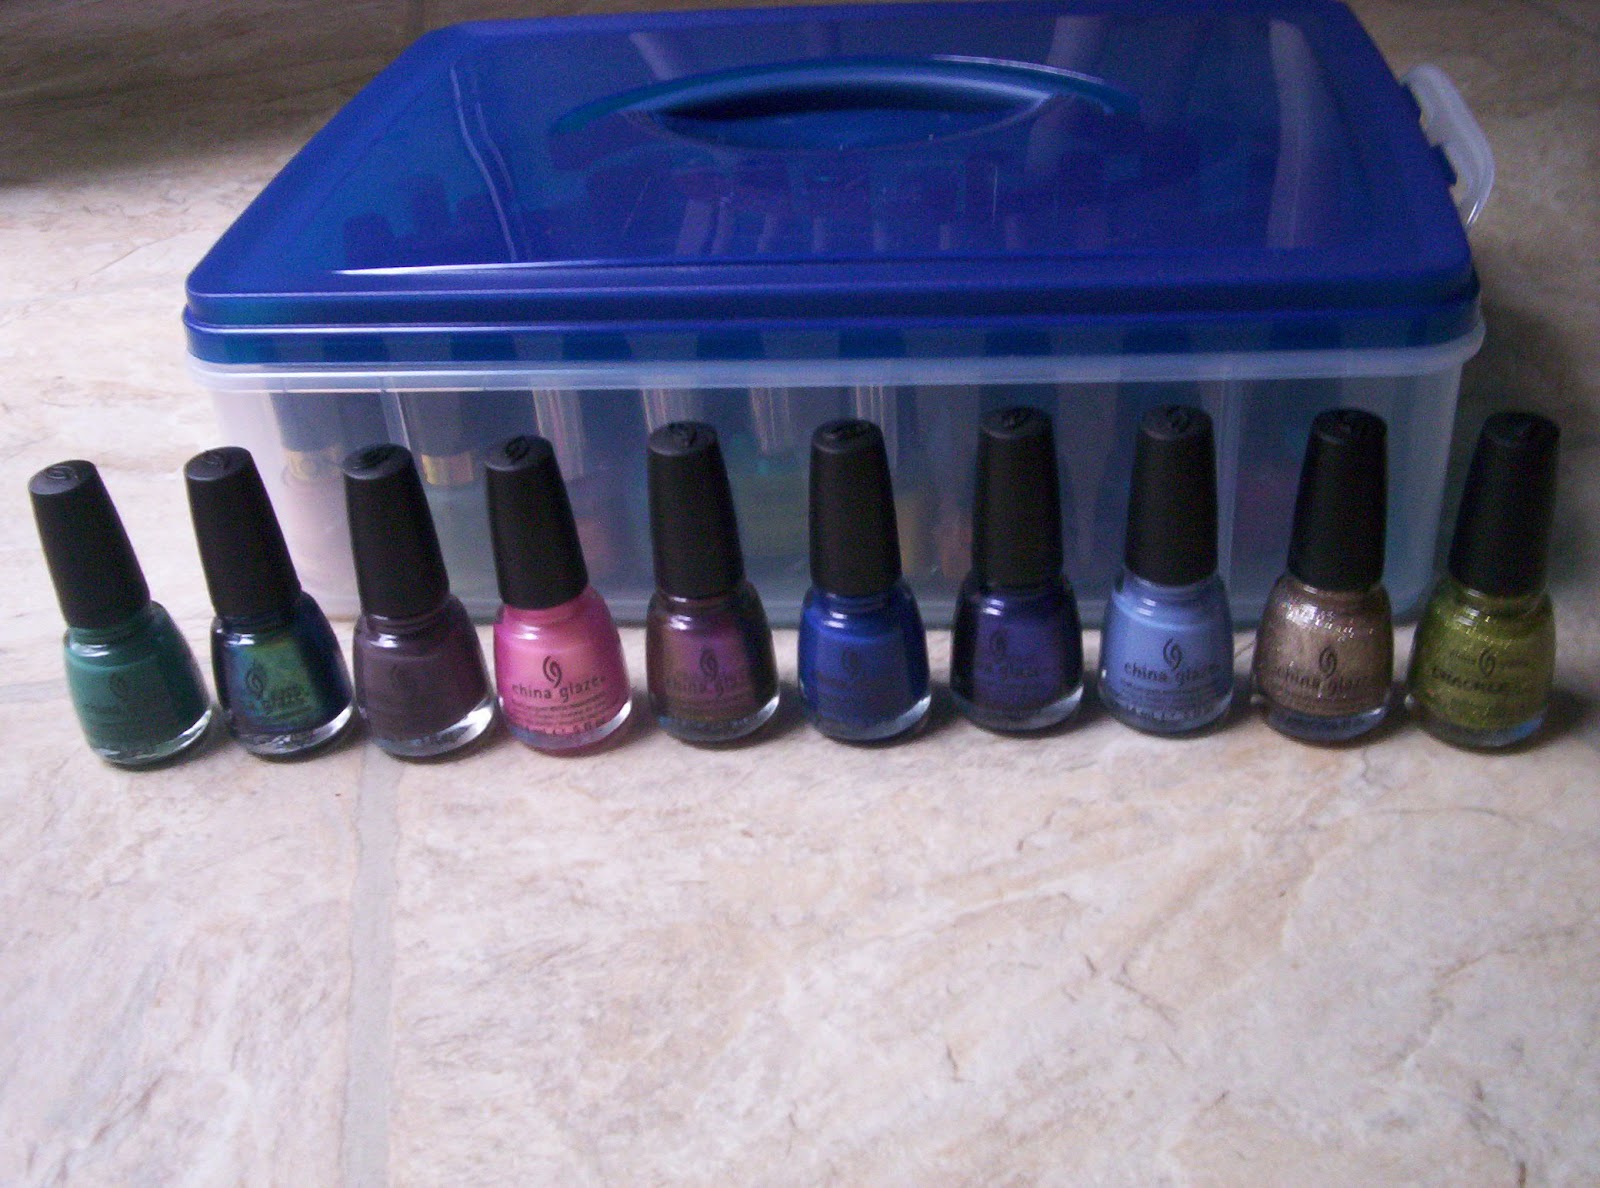
First, I got this stack-able box (from Target) that fits my nail polishes perfectly! It's the perfect height and has plenty of room... my 67 nail polishes fit in the bottom and there's still room to spare! I think both containers could easily hold 200 nail polishes. The only thing you have to be careful about - nail polishes are heavy, so you might want to hold the container from the bottom because if you hold it from the handle there might be a big mess :)


Now, the nail polishes...


I went from having none to 10 China Glaze nail polishes over this past weekend. I also added a few other new brands to my collection. About half of these I bought with a birthday gift card and the other half were given to me. Starting with China Glaze... (left to right) Exotic Encounters, Deviantly Daring, Jungle Queen, Exceptionally Gifted, No Plain Jane, Man Hunt, Want My Bawdy, Secret Peri-wink-le, I'm Not Lion, and Jade-d (crackle). From the bottom picture, (left to right) Essie - Play Date, Turquoise & Caicos, Sinful Colors Magnetic - Charge It Up, Nichole - Rainbow in the S-Kylie, Elf - (no color name on this one), Orly - Mysterious Curse, Finger Paints - It Baroque, and Sally Girl - (again, no color name). I'm so excited to try all of these out... let me know in the comments which ones you like.
Bonus picture...

My messy bed as I unwrap and put away everything :)

First, I got this stack-able box (from Target) that fits my nail polishes perfectly! It's the perfect height and has plenty of room... my 67 nail polishes fit in the bottom and there's still room to spare! I think both containers could easily hold 200 nail polishes. The only thing you have to be careful about - nail polishes are heavy, so you might want to hold the container from the bottom because if you hold it from the handle there might be a big mess :)


Now, the nail polishes...


I went from having none to 10 China Glaze nail polishes over this past weekend. I also added a few other new brands to my collection. About half of these I bought with a birthday gift card and the other half were given to me. Starting with China Glaze... (left to right) Exotic Encounters, Deviantly Daring, Jungle Queen, Exceptionally Gifted, No Plain Jane, Man Hunt, Want My Bawdy, Secret Peri-wink-le, I'm Not Lion, and Jade-d (crackle). From the bottom picture, (left to right) Essie - Play Date, Turquoise & Caicos, Sinful Colors Magnetic - Charge It Up, Nichole - Rainbow in the S-Kylie, Elf - (no color name on this one), Orly - Mysterious Curse, Finger Paints - It Baroque, and Sally Girl - (again, no color name). I'm so excited to try all of these out... let me know in the comments which ones you like.
Bonus picture...

My messy bed as I unwrap and put away everything :)
Monday, September 17, 2012
Birthday Nails!
Hi, everyone! Well, this past weekend was my birthday - yay! - It was a lot of fun! So, I made this party nail design...

I don't know if you can tell in this picture, but I made a faded pink french tip. I used a base coat (as I always do) and painted the bottom 1/3 of my nails a light pink, wiping off the brush before so there wasn't much polish on it, then I painted the tip of my nails with the same light pink but with more polish on the brush. This makes a pretty faded effect on your nails. After that, I used a sparkly polish for some confetti on my nails. Really sparkly and fun! Another blog post will be up soon on my birthday nail polish haul (probably the biggest and most fun haul ever). Can't wait!
I don't know if you can tell in this picture, but I made a faded pink french tip. I used a base coat (as I always do) and painted the bottom 1/3 of my nails a light pink, wiping off the brush before so there wasn't much polish on it, then I painted the tip of my nails with the same light pink but with more polish on the brush. This makes a pretty faded effect on your nails. After that, I used a sparkly polish for some confetti on my nails. Really sparkly and fun! Another blog post will be up soon on my birthday nail polish haul (probably the biggest and most fun haul ever). Can't wait!
Monday, September 3, 2012
Kiwi Nails
Hi, everyone! I've got another fruit nail design today - rocking on those fruits for the end of summer...

Kiwi nails! They were pretty popular this summer, so I thought I'd try them out at the last minute... It's hard to believe summer's already almost over : / We've got a new season coming up, though - colorful fall! Got to be excited for the new weather :) Back to my nails... for the design, I started off painting all my nails a lime green, and then added a white oval to the center of each nail (it doesn't have to be perfect). Stick a toothpick in some white polish and draw small, short lines coming out of the white center (which I find to be the hardest part). Dot on some black dots around the white, and you're done! It isn't the easiest design to do, but don't get scared, it isn't the hardest, either. Have fun!
Kiwi nails! They were pretty popular this summer, so I thought I'd try them out at the last minute... It's hard to believe summer's already almost over : / We've got a new season coming up, though - colorful fall! Got to be excited for the new weather :) Back to my nails... for the design, I started off painting all my nails a lime green, and then added a white oval to the center of each nail (it doesn't have to be perfect). Stick a toothpick in some white polish and draw small, short lines coming out of the white center (which I find to be the hardest part). Dot on some black dots around the white, and you're done! It isn't the easiest design to do, but don't get scared, it isn't the hardest, either. Have fun!
Saturday, August 25, 2012
Handful of Strawberries
Hi, everyone! I've got a really cute design to show you all...

Doesn't it look like a handful of strawberries? They look so real. This is definitely one of my favorite designs. It was also super fun to paint these. I painted all of my nails red and then painted on some leaves at the bottom of my nails with a small paint brush and green polish. To do the seeds I used my paint brush again with black polish. So cute! I highly suggest trying this design - it's really easy and fun and will have you (and others) staring. :)
Doesn't it look like a handful of strawberries? They look so real. This is definitely one of my favorite designs. It was also super fun to paint these. I painted all of my nails red and then painted on some leaves at the bottom of my nails with a small paint brush and green polish. To do the seeds I used my paint brush again with black polish. So cute! I highly suggest trying this design - it's really easy and fun and will have you (and others) staring. :)
Friday, August 3, 2012
Olympic Nails
Hey, everyone! I just came up with a new design to show some Olympic spirit...

A geometric (or block) Olympic design! Notice the bronze, silver, and gold colors I used for my geometric design? To do this, I painted all of my nails white and then painted all of my nails except for the thumb a bronze color. I used a gray color (which, unfortunately, turned out to be a more blueish color) and filled the bottom 2/3 of my nails slanting in one direction. For the gold I filled the bottom 1/3 the opposite direction (if I'm making any since). The Olympic rings are pretty self-explanatory - I used a gold nail art pen. Geometric and block designs are a pretty big trend right now - what better way to try one out for the first time than this neat design? Hope you enjoyed, and will try it yourself!
A geometric (or block) Olympic design! Notice the bronze, silver, and gold colors I used for my geometric design? To do this, I painted all of my nails white and then painted all of my nails except for the thumb a bronze color. I used a gray color (which, unfortunately, turned out to be a more blueish color) and filled the bottom 2/3 of my nails slanting in one direction. For the gold I filled the bottom 1/3 the opposite direction (if I'm making any since). The Olympic rings are pretty self-explanatory - I used a gold nail art pen. Geometric and block designs are a pretty big trend right now - what better way to try one out for the first time than this neat design? Hope you enjoyed, and will try it yourself!
Subscribe to:
Posts (Atom)